Can you cut 1 Tonne of carbon pollution out of your life?
Take the challengeThere's a reason Snickers bars are so popular. Yet, there is a reason to avoid them. A sugar high feels good for about 5 minutes, and then you crash. Try this more natural alternative instead!
I should preface this recipe by saying that just because these aren't store bought, it doesn't mean they're "healthy". Most of the ingredients are nutrient dense, but these are still an "eat in moderation" food.
For a vegan option you can sub out the honey for agave or maple syrup and swap the chocolate for this vegan alternative.
Ingredients:
2 bananas
3 Tbsp. peanut butter (or any nut butter on hand)
2 Tbsp. liquid honey (or firm granulated honey + 2 tsp. water)
2 Tbsp. roasted and salted peanuts (20 g.)
200 g. dark chocolate (or 1 c. semi-sweet chocolate chips + 2 Tbsp. oil)
Method:
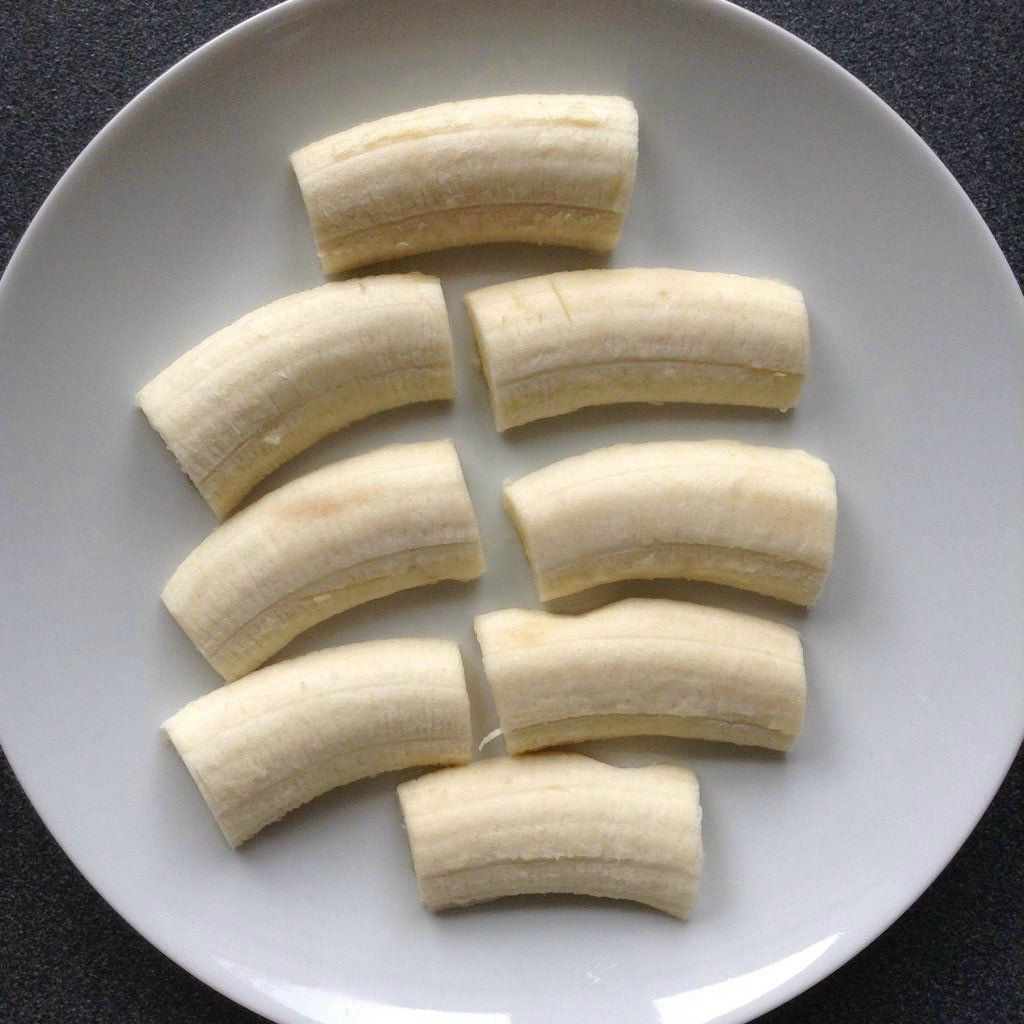
1. The ice-cream base is as simple as a frozen banana – but that doesn't mean the taste can't be sophisticated!
Overripe bananas are best, as they are the sweetest and will yield the creamiest base (and they give you an excuse to make Snickers!). Peel the bananas, cut them in half, and cut off the ends (only for the sake of aesthetics – skip if you don't care). Next, split the banana pieces in half, place them cut-side-down on a plate, and put them in the freezer for a couple of hours or overnight. Freeze the ends for a smoothie or simply gobble them down!
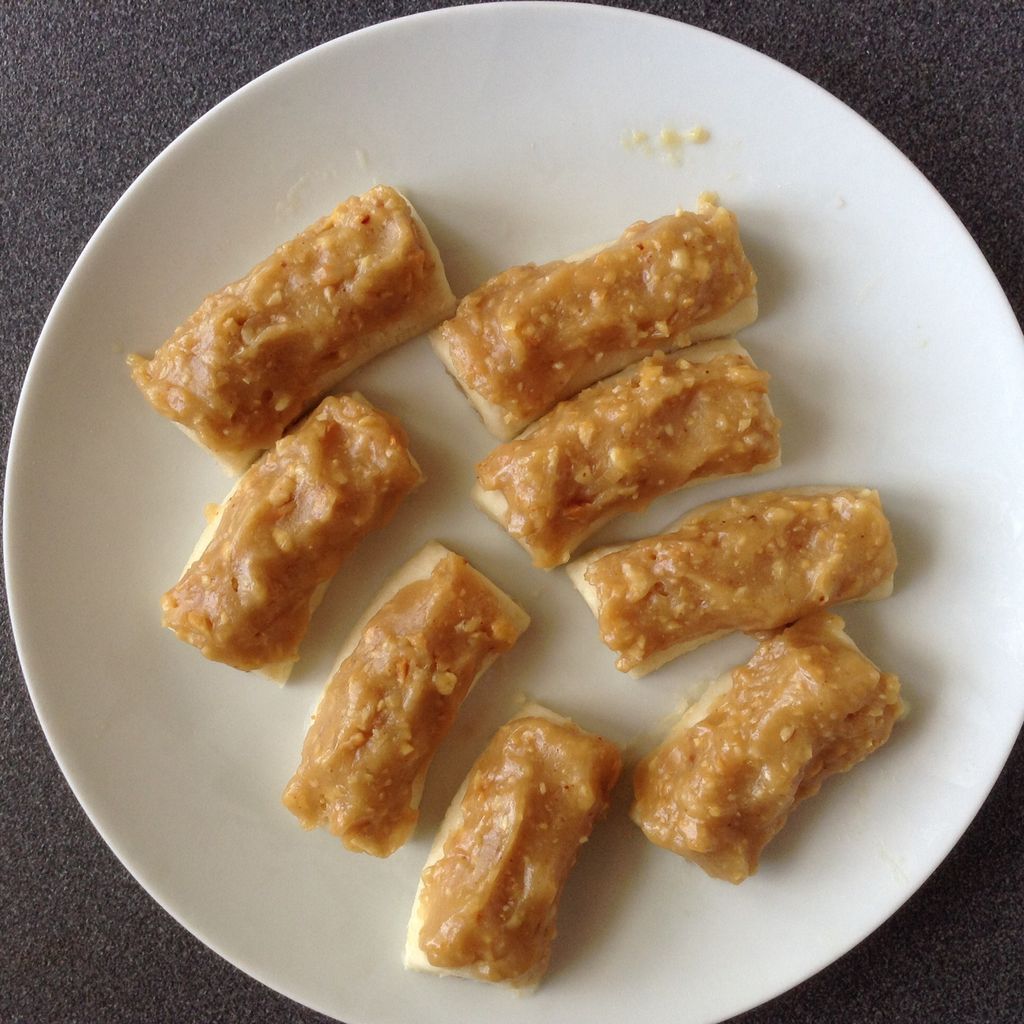
2. For the filling, chop some roasted and salted peanuts and mix with peanut butter and honey. Natural peanut butter without refined fats and sugar is great. Set the filling aside until ready to use.
3. When the bananas are frozen, divide the caramel filling among them and spread it out to cover the top. I think this is easiest done with my fingers dipped in some water, as the water will prevent the caramel from sticking. Return to the freezer till the caramel is frozen.
4. When the caramel is frozen, melt the chocolate for the coating.
Even though it is not strictly necessary, tempering the chocolate is best, as it gives the shell that extra pleasant crackle. And it's super simple!
First, prepare a water bath by placing a heat-resistant bowl over a pot with boiling water. Finely chop up chocolate (unless you are using chocolate chips), and then place 2/3 of it in the bowl. Let it melt undisturbed until you can see the outermost chocolate pieces have begun spreading and the rest of the chocolate is glossy. Now, stir the chocolate, and if there are any more lumps, let them melt.
When the chocolate is melted and smooth, remove the bowl from the pot and add the unmelted chocolate to the melted. Stir until everything is smooth again, and voila! tempered chocolate ready to use.
NOTE: When water steam begins to escape from under the bowl, remove the pot from the heat, so that no moisture gets in the chocolate. If the chocolate will not melt, return the pot to the heat. Always be careful that no water gets in the chocolate, as that will ruin it.
Please note that chocolate should never be melted directly in a pot on the heat.
5. When the chocolate is melted (and tempered), it's time to coat the bars. Remove about four frozen banana/caramel pieces from the freezer at a time.
Using forks, dip one piece at a time in the chocolate and quickly twist it around until it is coated. Lift it up with a fork and tap the fork firmly against the edge of the bowl to let excess chocolate run off. Place the bar on a piece of parchment paper and proceed to the next piece.
When the chocolate has hardened a bit, return the bars to the freezer.
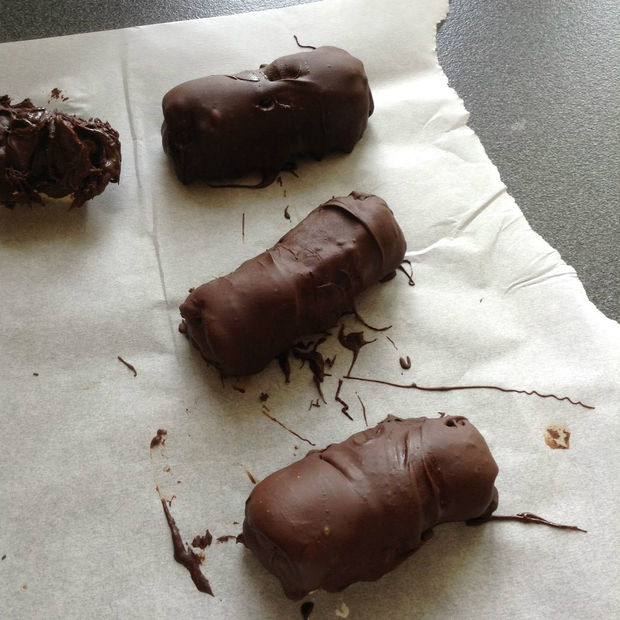
NOTE: This is probably the hardest part of making the bars, as the frozen insides make the chocolate harden really fast. I find it difficult to get an even coating, particularly on the underside, but as long as the top looks nice, I am satisfied! Usually the last couple of bars will not look so good, because there is almost no chocolate left, but they are perfect for taste testing!
Another thing to keep in mind is that if the bananas are allowed to melt too much before they are dipped, the moisture can cause the chocolate to sieze and be ruined. So make sure to remove the bananas from the freezer in small batches. As soon as the chocolate is on the bananas, it doesn't hurt if the bananas melt a bit when they are served.
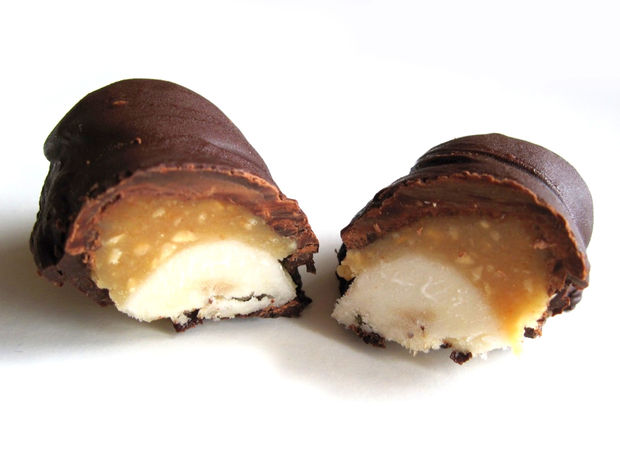
As soon as the chocolate has hardened, the bars can be enjoyed. Otherwise, they should be stored in the freezer until they are served. They can keep covered for at least a couple of weeks.
This recipe was adapted from an Instructable by PinchofChili
Try this next: Pantry-staple chocolate mug cake
We're in a climate emergency and it's going to take all of us to get out of it. That's why 1 Million Women is building a global community of women committed to fighting climate change with our daily actions. To join the (free) movement just click the button below!